


- 1
- 2
- 3
- 4
- HFSS15�ھ�����
- ���
- HFSS�̌W
- HFSS 15 �ھ������ęn
Running Simulations > High Performance Computing (HPC) Integration > Integration with Platform’s Load Sharing Facility (LSF)
Job Management User Interface for LSF
The Job Management UI is accessed by running ANSYS Electromagnetics product Desktop on the designated 'Postprocessing node' of the cluster. The Desktop provides UI commands for Scheduler selection, Job submission and Job monitoring/control. You access the Scheduler User Interface by clicking Tools>Job Management>Other Schedulers.

Before you can use Submit Job, you must click Select Scheduler as the one-time initial step. This opens the Select Scheduler dialog.

Specify the following parameters:
• Job submission node: this is the node on the cluster where scheduler commands (such as LSF's bsub) are allowed to run.
Choose Use this computer if scheduler commands are enabled on the post-processing node.
Choose Use a computer on network if the cluster is configured in a manner as to disallow job-submission from the post-processing node. Specify node name appropriately.
Pre-requisites: For this choice to work, the job-submission node must already be configured with a running Ansoft RSM service, as documented in the 'Installation/Configuration' section
• Scheduler: Available choices are: LSF and SGE. It is possible for you to integrate their custom scheduler into this UI, through a scheduler proxy. When this is done, more choices will be available in the combo-box, one per custom scheduler proxy that is deployed in the installation
After specifying the job submission node, you can click Refresh. The scheduler information is then listed in the Scheduler info text field.
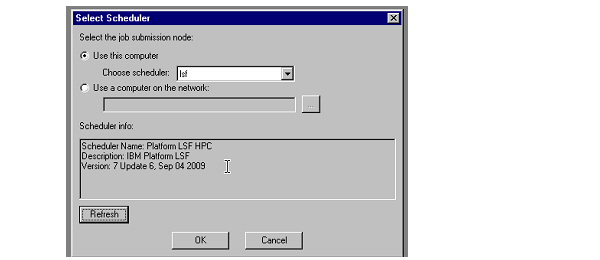
Once you select a scheduler, you can access the interface for job submission, monitoring and control. Click OK to close the dialog.
You access the Job submission UI by clicking Tools>Job Management>Other Schedulers>Submit Job.... This command launches a multi-tab dialog.
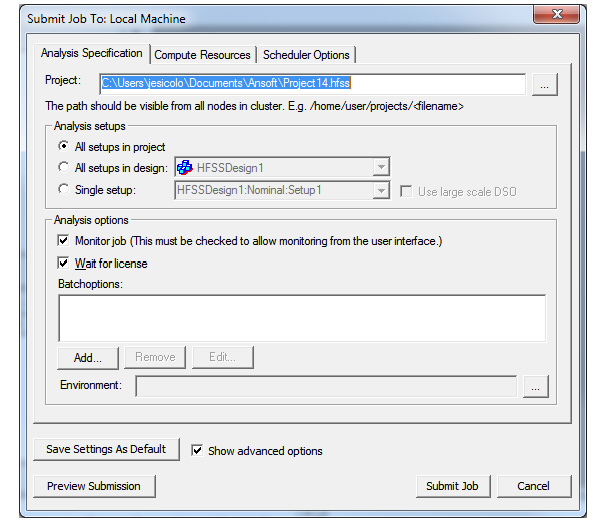
• The Analysis Specification tab has parameters to specify the input project model, the analysis setup and analysis options (including batchoptions) that affect analysis algorithms.
• The Compute Resources tab specifies the amount of compute resources and how to select specific resources from the available pool (for example, <queue_name> is an LSF parameter that restricts job's candidate nodes to nodes in this queue).
• The Scheduler Options tab has analysis-independent parameters specific to the job, such as name, priority.
Analysis Specification tab for LSF
This tab lets you specify the following:
Project:
You can use the ellipsis button [...] to use a navigation window to browse. The path should be visible to all nodes in the cluster.

Analysis Setups:
Specify All setups in the project, all in a design, or a single setup. If the setup includes a parametric sweep, the Use large scale DSO checkbox is enabled.

Analysis Options:
• You have checkboxes for whether to Monitor Job through the GUI, and whether to Wait for license.
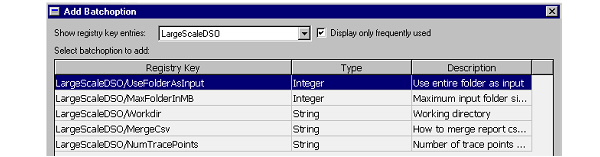
• You can also specify Batchoptions. Click the Add... button to open a dialog for selecting the Batchoptions.
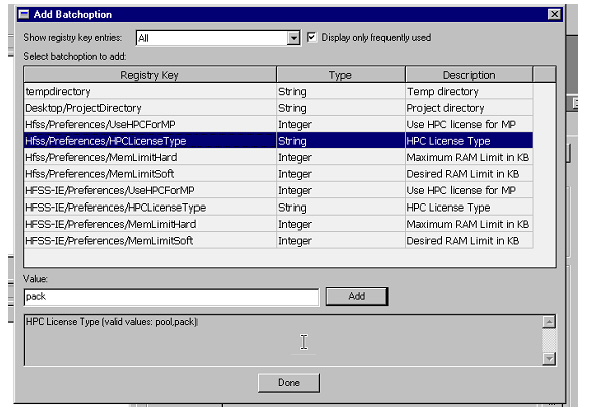
The lower Value field shows the legal values for the selected registry key. You can type the desired value into the upper text field under value. Click the Add button to accept the selection of the registry key with the specified value. Click Done close the Add Batchoption dialog.
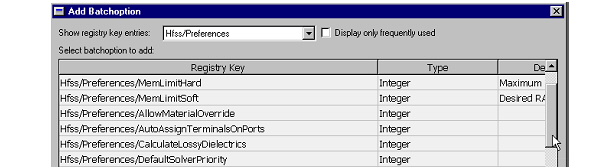
At the upper left, a drop down menu lets you specify which registry key categories to display, whether All, or selected category.

A checkbox lets you choose between displaying only frequently used entries (the default), or by unchecking, all options available for the selected group.
Note that for Large Scale DSO problems, you also have the option to Add Batchoption for relevant Registry Keys.
The added registry keys and values are listed in the Batchoptions field of the Submit Job dialog.
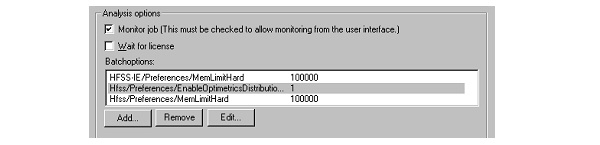
Selecting from the list enables buttons for removing or editing registry key values. Selecting a registry key and clicking Edit... opens the Edit Batchoptions dialog.
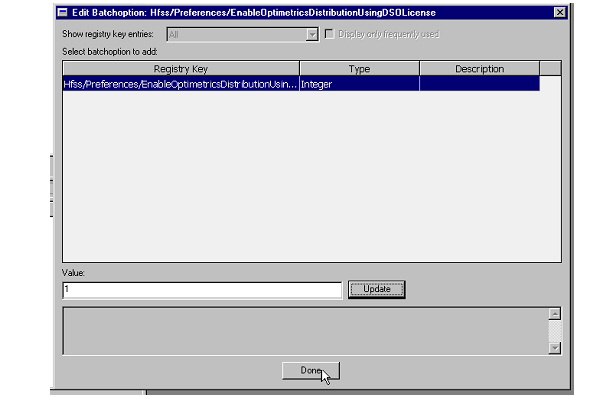
Here you can edit the Value field and update the value for the selected registry key.
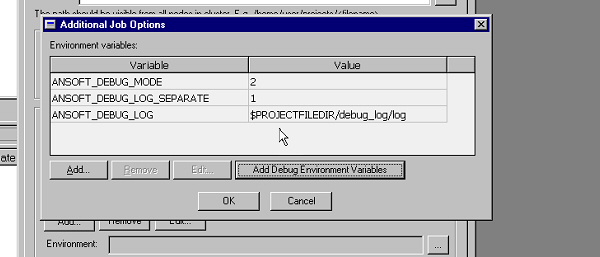
Environment:
This permits specifying Environment Variables. Click the ellipsis button [...] to open the Additional Job Options dialog.
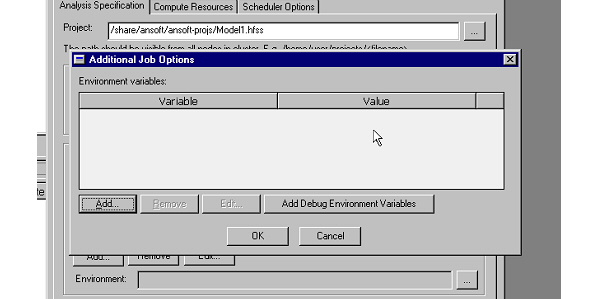
The Add button permits you to specify your environment variables. Once, added, you can select Remove or Edit. The Add Debug Environment Variables button adds variables of use in working with support.
• The Save Settings as Default button lets you save a current set of values as defaults the next time you invoke the Scheduler GUI. This can simply subsequent job submissions.
Compute Resources Specification Tab
This tab lets you provide Resource selection and Job parallelization parameters. Once you have specified parameters, you can Save Settings as Defaults, Preview a Submission, and Submit a job.
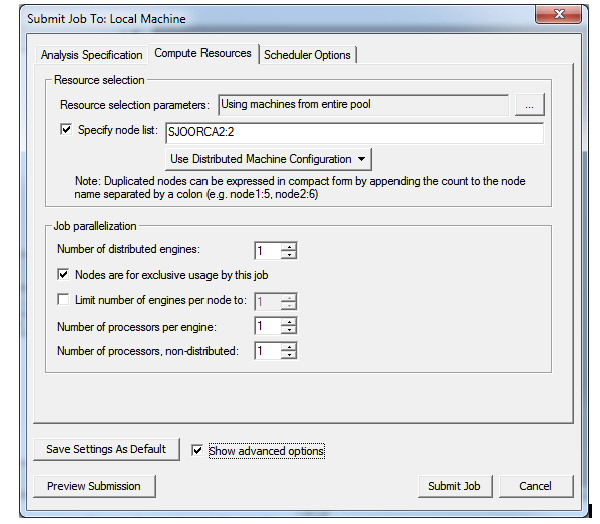
Resource Selection:
If you do not specify parameters for resource selection, LSF may submit jobs to any machine in the entire pool that is available.
• Resource selection parameters.
Clicking the ellipsis button [...] opens a dialog for parameters specific to LSF, in this case Queue. The Specify Parameter checkbox in the dialog enables a parameter, and you can select the Value for the Queue parameter from a drop down menu.
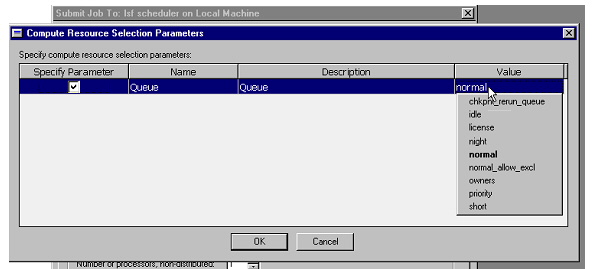
If you don’t specify a parameter, the scheduler handles the situation.
• Specify node list
Checking Specify node list enables the field for specifying a node list, and the drop down for Use Distributed Machine Configuration menu, that lets you select from pre-defined lists. In a computing environment where the available cores are not uniform, you can use this to have control over which resources your job will use.
Job parallelization:
The values you specify here represent minimal requirements for each condition that can interact in leading to the total resources the Scheduler derives from them. If you specify a node list in the Resource selection area, that takes priority over any values specified in Job parallization (which are then ignored).
• Number of distributed engines
• Whether Nodes are for exclusive usage by this job
• Whether to Limit number of engines per node to a value
This can be useful in situations where the amount of memory available for node is limited relative to the requirements for the project, and you want to ensure sufficient memory per process.
• Number of processors per engine
• Number of processors, non-distributed (visible only when Show advanced options is checked.)
In response to a set of minimal constraints, the Scheduler may increase the resources assigned beyond the minimal values in order to meet the full set of requirements. For example, if you specify 7 distributed engines, with two processors per engine, and also limit the number of engines per node to 4, the scheduler may increase the number of cores used in order to meet the limit specified for engines per node. Notice that a preview of the Submit Job Results shows the number of resouces assigned, and that the scheduler generated code includes an MPI specification.
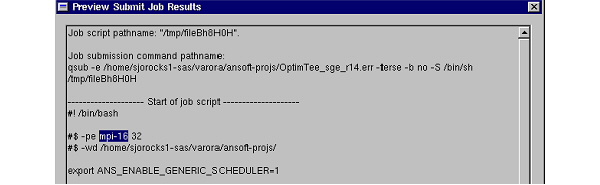
Preview submission
This opens a screen showing the bsub command to be used to submit the job.
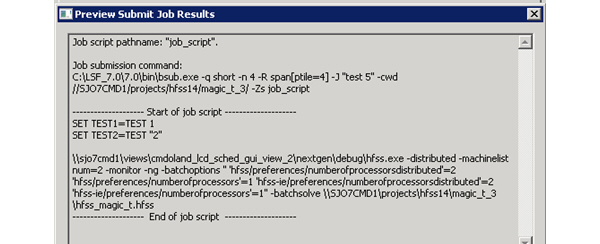
Submit job actually sends the batch command to the LSF cluster.A dialog reports a successful submit and presents a checkbox for monitoring.

Scheduler Options Tab
This tab lets you give Job name and Priority.
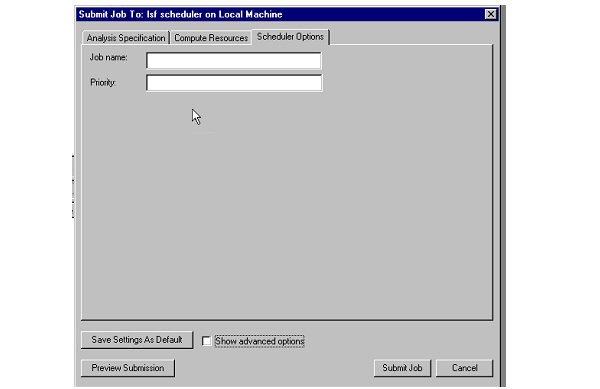
You continue to have the Save Settings As Default, Preview Submission, and Submit Job buttons.
If you check Show advanced options, you can also specify Job submission options.
The Job submission options permit you to customize a job submission in terms of addition job submission options, or override a job submission command.
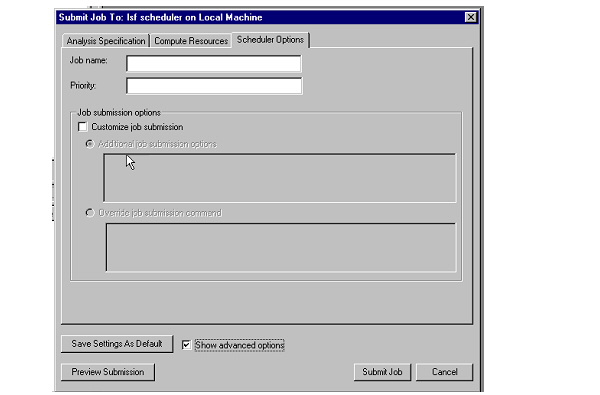
Text in the enabled field is appended to the bsub command. You can see the effects of any custom additions by clicking Preview Submission.
Related Topics
Integrated Job Monitoring for Job Management Interface for LSF
Scheduler Proxy Interfaces
-

������ȫ���HFSS��Ӗ�n�̣�����7��ҕ�l�̳̺�2���̲ģ��Y����v�⣬ҕ�l������ʾ���Y�����¹��̰�����HFSS�W�������y...��Ԕ����B��
